
Water Leaking Through the Ceiling After Rain: What It Means and What to Do
Seeing a water stain on the ceiling right after a storm is one of those moments where your brain goes, “How bad is this going to get?”
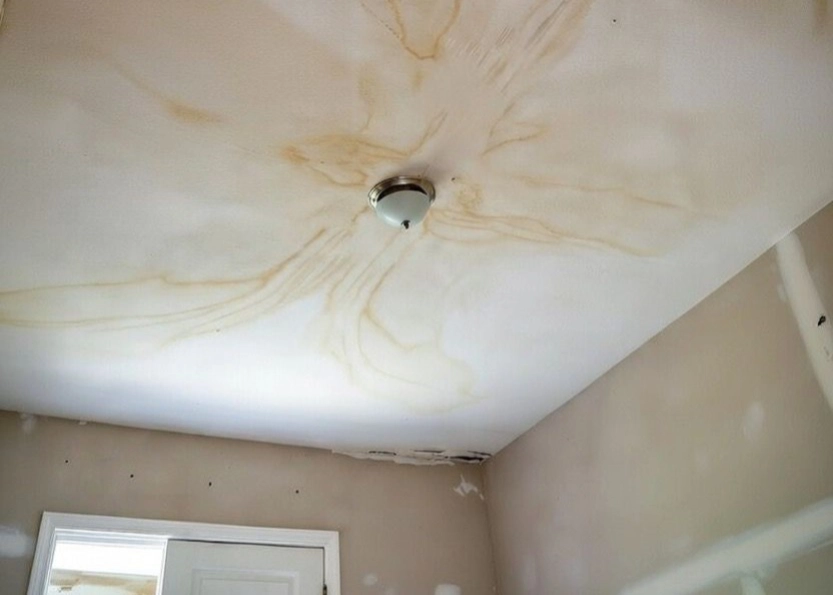
Here’s the truth: a ceiling leak after rain is rarely “just a small drip.” Water does not politely fall straight down. It runs along timber, soaks insulation, and can travel several feet before it finds the easiest way out, which is usually a seam, a light fitting, or a weak spot in the drywall.
The good news is you can limit the damage if you act in the right order, then get our roof leak repair team to trace the real source and stop it returning.
Key takeaways
- The stain rarely sits below the leak. Water travels along rafters and soaks insulation before breaking through the ceiling.
- Roof leaks tend to track with rain and wind. Plumbing leaks happen even when dry and sit under bathrooms or pipe runs.
- Act in order: protect electrics, control the water, move valuables, take photos, then ventilate.
- Treat it as urgent if the ceiling is sagging, water is near lights, or the stain grows fast during rain.
This guide breaks down:
- What’s likely happening
- The most common roof-related causes
- How to tell roof leak vs plumbing
- What to do immediately, and what not to do
- When it becomes urgent
- What a real inspection looks like
- The next step if you want it sorted properly
What’s really happening when water shows up on the ceiling
When rain gets into a roof system, it usually follows this path:
- Entry point: A gap in the roof covering or around a detail (like flashing).
- Hidden travel: Water runs along the underside of the roof deck or along rafters.
- Saturation: Insulation soaks up water like a sponge, holding it in place.
- Breakthrough: It finally drips through a ceiling joint, a crack, or around a fixture.
That’s why the stain might be in your bedroom, even though the problem is over the hallway, the chimney, or a roof valley.
Also, the first rain after a dry spell often makes leaks show up because debris shifts, sealants flex, and water finds the new weak point.
First, is it definitely the roof and not plumbing?
A quick way to narrow it down:
It’s more likely a roof leak if:
- It happens during rain or right after
- It gets worse during heavy wind-driven rain
- You see it near external walls, chimneys, skylights, or upstairs ceilings under the attic
- The stain grows after each storm
It’s more likely plumbing if:
- It happens even when it hasn’t rained
- It’s under a bathroom, shower, toilet, radiator, or water tank
- You notice dripping when someone uses water upstairs
- The stain is near pipe routes (often straight lines)
If you’re not sure, don’t play detective for a week. The longer you wait, the more damage spreads.
What to do immediately (the correct order)
This is where most homeowners mess it up. They focus on “finding the roof hole” and ignore the bigger risk inside.
1) Protect people and electrics first
- If water is near a light fitting, ceiling fan, or electrical socket, turn off power to that circuit at the consumer unit.
- If you’re unsure, turn off the main switch and use a torch.
Water and wiring is not a DIY experiment.
2) Catch and control the water
- Put a bucket under the drip.
- If the ceiling is bulging (water trapped above the drywall), you can carefully release pressure:
- Put a bucket underneath
- Use a screwdriver to make a small hole at the lowest point
- Let it drain slowly
This looks scary, but it can prevent a sudden collapse that dumps gallons onto your floor.
3) Move valuables and protect flooring
- Move furniture out of the area.
- Put down towels, plastic sheeting, or a tarp.
4) Take photos
- Take clear photos of the ceiling stain, any dripping, and any visible roof damage outside.
- If you have insurance, this helps later. If you don’t, it still helps track whether it’s getting worse.
5) Ventilate the room
- Open windows if it’s safe.
- If you have a dehumidifier, run it.
- The goal is to slow mould growth.
What NOT to do (these “quick fixes” backfire)
- Don’t paint over the stain. That just hides it and traps moisture.
- Don’t keep poking holes all over the ceiling. One controlled drain hole is enough.
- Don’t climb onto a wet roof. That’s how people end up injured.
- Don’t blast sealant randomly on tiles or flashing. You can trap water where it shouldn’t be, and it makes proper repair harder later.
Temporary protection is fine. Guesswork repairs usually make it worse.
Common roof causes of ceiling leaks after rain
These are the usual culprits we see when a ceiling leak shows up after bad weather:
1) Damaged or slipped tiles or slates
Wind can lift or crack tiles. Even one slipped tile can create an entry point that only leaks in heavy rain.
What you might notice:
- A sudden leak after a storm
- Pieces of tile in the garden
- A new rattle or loose section in wind
2) Flashing problems (chimneys, walls, valleys)
Flashing is the material that seals joints and directs water away, especially around:
- Chimneys
- Roof-to-wall junctions
- Valleys (where two roof slopes meet)
- Dormers
If flashing has lifted, cracked, or been poorly installed, water gets in fast.
3) Blocked gutters causing overflow
If gutters are full of debris, water spills back toward the roof edge. That can soak fascia boards and creep into the roof structure.
This is common when:
- The leak is near the outer edge of rooms
- The rain was heavy
- The building is near trees
4) Roof valley issues
Valleys handle a huge volume of water. If the lining is damaged or the detail is wrong, leaks show up under heavy rain even if the rest of the roof looks “fine.”
5) Vent pipe boots and roof penetrations
Any pipe, vent, or flue that goes through the roof needs a proper seal. Rubber parts can crack with age, UV, and temperature changes.
6) Underlay or membrane failure
Underlay is not meant to be a permanent waterproof roof, but it does act as a backup layer. If it’s torn, aged, or installed poorly, you can get leaks even when tiles look intact.
7) Previous “patch repairs” that didn’t solve the cause
A lot of roof leaks are repeat offenders because someone fixed the symptom, not the cause. Example: sealing around a tile when the real issue is a valley detail or flashing joint.
Signs the leak is becoming urgent
If any of these are true, treat it as urgent:
- The ceiling is sagging
- Water is dripping near lights
- The stain is growing quickly during rain
- You can smell a musty odour (early mould warning)
- You see damp patches on walls below the roofline
- You hear dripping in cavities even when you can’t see it
Waiting turns a repair into a bigger job. Not because roofers are “upselling,” but because wet timber and plaster do not improve with time. If the ceiling is sagging or water is running near your lights, it is worth getting an emergency roofer out the same day rather than holding on until the next dry spell.
Why you should not ignore a ceiling leak
People ignore small stains because they’re busy, and because they hope it will “dry out.”
Here’s what actually happens:
Mould can start fast
In many homes, mould growth can begin within 1–2 days if materials stay damp. Once it’s in insulation or behind plasterboard, it can spread without being obvious.
Timber damage gets expensive
Wet timber can rot. Rot weakens the structure and often leads to bigger repairs.
Ceilings can collapse
Wet plasterboard becomes heavy. A sagging ceiling can fail suddenly, especially after multiple storms.
Electrical risk is real
Moisture near wiring can cause shorts, corrosion, and in worst cases, fire risk.
How a proper roof leak inspection works
A good inspection isn’t “a guy glances at the roof for 2 minutes.” That’s useless.
A real inspection usually includes:
1) Questions that narrow the cause
- When did it start?
- Does it only happen when it rains?
- Does wind direction affect it?
- Has any roof work been done recently?
2) Internal checks
- Loft/attic inspection for wet insulation, water trails, and staining on rafters
- Looking for daylight through roof coverings
- Checking ventilation and condensation signs (because not all “leaks” are rain)
3) External inspection
- Tiles, ridges, hips, valleys
- Chimney and wall flashing
- Gutter overflow points
- Roof penetrations
4) Clear explanation of the likely entry point
Not vague guessing. A decent roofer explains:
- what failed
- why it failed
- what needs fixing
- what can wait (if anything)
Can you do a temporary fix until someone arrives?
Yes, but keep it realistic.
What’s reasonable:
- Catch water inside
- Drain a bulging ceiling in a controlled way
- Clear visible gutter blockages from the ground if safe
- Add a tarp on the roof only if it can be done safely (ideally by someone experienced)
What’s not reasonable:
- Climbing up in rain
- Smearing sealant everywhere
- Trying to replace tiles without knowing the roof detail
If it’s actively leaking, the best “temporary fix” is damage control inside, and booking someone who actually knows what they’re looking at.
What happens after the roof is fixed?
Even after the roof repair, the inside might still need attention.
A ceiling stain usually means the area got wet. That can involve:
- Drying time (sometimes days)
- Replacing sections of damaged plasterboard
- Stain blocking primer before repainting
- Checking insulation condition in the loft
If insulation is soaked and left in place, it can hold moisture and lead to mould.
If water is coming through right now, the first ten minutes
The order above is the right one. If it is actively coming through as you read this, here is that same sequence condensed, plus the details people most often miss when they are panicking.
Do this first, in order
- Switch off the electrics to the affected area at the consumer unit.
- Contain the water with buckets, bins and towels.
- Safely pierce a bulging ceiling to drain it into a bucket.
- Move valuables and cover the floor.
- Take photos and a short video for insurance.
- Call an emergency roofer. Do not climb on the roof.
Contain it properly, not just quickly
If the drip is fast, put a smaller container inside a larger one so you can swap it out without stopping the catch, and have a second bucket standing by. A leak that starts slow often speeds up as more water finds the same path. Lay towels or old sheets around the bucket to stop splashing and spreading.
Stand to the side when you drain a bulge
When you pierce a sagging ceiling, put the bucket directly under the lowest point, make one small hole at that lowest point, and stand to the side rather than underneath while it drains. One controlled hole is far better than ten, and far better than a section giving way and dumping gallons at once.
Leave wet fittings switched off
Do not switch wet lights or sockets back on until an electrician or roofer has confirmed the area is dry and safe. If you can see water pooling inside a light fitting or bulging around a downlight, treat it as live and dangerous until the power is off at the consumer unit.
Take a short video, not just photos
A few seconds of video showing the water actually coming through is worth more than a still if you end up claiming. Record it before you clear anything up, along with any damaged belongings and any roof or gutter damage you can photograph safely from the ground.
What to tell us when you call
Give us your postcode, when the leak started, and whether it tracks with the rain. That is usually enough for us to know what we are walking into before we arrive. Alliance offers a same-day response for active leaks with no call-out charge, and every repair is backed by our 10-year workmanship guarantee. Our emergency roof repair page explains how it works.
What the water stain itself is telling you
Before anyone climbs a ladder, the mark on the ceiling gives you three useful pieces of information: roughly where the water has been, whether it is still getting wet, and how urgently it needs sorting.
The colour
When water passes through plasterboard and then dries, it leaves behind the minerals and dirt it carried with it. That residue is the ring you can see. A yellow or tan stain is usually clean rainwater or condensation that has picked up dust on the way through. A darker brown ring often means the water has passed through timber, old adhesive or a dirtier route, which points more towards a long-standing roof leak.
The shape and the edges
A clear ring with a defined edge usually means the area got wet, then dried, then got wet again, building up layers like a tide mark. A soft, spreading patch with no hard edge is more likely to be still active or very recent.
Is it active or old?
This is the question that decides how fast you need to move.
Signs it is still active:
- The stain feels damp or cool to the touch, or leaves moisture on your fingers
- It grows or darkens after rain
- The plasterboard is soft, bulging or sagging
- You can see fresh water trails in the loft above it
Signs it is probably old:
- The mark is bone dry and has not changed for weeks, through wet and dry weather
- The edges are hard and well defined with no spreading
- You know the cause was dealt with, for example a burst pipe or a previous roof repair
A simple test: draw a light pencil line around the edge of the stain and note the date. If it spreads past the line after the next downpour, it is live and needs tracing. If you cannot tell, do not sit on it, because a stain that keeps rewetting is quietly damaging the timber and plaster behind it.
Could it be condensation rather than a leak?
Not every stain is a leak. Poor loft ventilation lets warm, moist air condense on cold surfaces and drip back down, leaving patchy staining rather than a single defined ring. It tends to be worse in winter and shows up over bathrooms and kitchens. The fix is ventilation and insulation, not a patch on the roof, so it is worth ruling in or out before spending money. If your ceiling is leaking when it has not rained at all, our guide on a ceiling leaking but no rain covers the internal causes.
Do not paint over it yet
Covering a live stain just traps moisture and it will bleed straight back through. Once the source is fixed and the area has dried out fully, a coat of stain-block primer followed by matching emulsion will hide the mark for good. Get the cause traced before you redecorate, so you only make good once.
Who to call: roofer, plumber, builder or insurer
Calling the wrong trade wastes a day you do not have. A plumber cannot fix a slipped tile, and a general builder is not the person to trace a hidden roof leak in the rain. The roof-versus-plumbing test earlier in this guide is the first filter: if the leak tracks with rain or wind-driven weather, it is a roofer; if it leaks in dry spells or sits under a bathroom, radiator or pipe run, start with a plumber. Here is the rest of the decision.
A builder is for the mess, not the diagnosis
A general builder or plasterer is the right call once the leak is stopped and the ceiling itself needs putting right: replacing damaged plasterboard, re-skimming, redecorating. What a builder is not set up to do is climb up in bad weather and trace exactly where water is entering a roof. Fix the cause first, then bring a builder in for the cosmetic repair.
When to involve your insurer
Home insurance usually covers sudden and accidental damage, for example a storm lifting tiles or an escape of water, but not gradual wear and tear like a roof that has slowly worn out. Three sensible rules:
- Photograph the ceiling and any outside damage before anyone touches it.
- Get the leak traced and stopped first, because insurers expect you to prevent further damage.
- Keep the roofer's written report and quote, as it supports any claim.
You do not have to decide on a claim before you call a roofer. Get the source found, get it made safe, then decide with the facts in front of you.
What to have ready before you call
You will get a faster, more accurate answer if you have a few things to hand:
- Photos of the ceiling stain, any dripping, and any visible roof damage taken safely from the ground.
- When it happens, in rain only, in wind, or regardless of weather. This one detail often decides roofer versus plumber.
- How long it has been going on and whether it is spreading.
- Any recent work on the roof, loft or plumbing.
- Your postcode, so we can confirm we cover you and give a realistic arrival time.
What it costs to fix a ceiling leak from the roof
What actually drives the cost is the fault behind the leak, how easy it is to reach, and how long it has been left. A slipped tile and a failing chimney flashing produce the same brown ring on your ceiling but sit at very different ends of the price scale. These are realistic ranges for the roofing repair itself in the South East.
| Type of repair | Typical price guide |
|---|---|
| Leak trace & minor repair (a slipped or cracked tile, small seal) | £150 – £350 |
| Flashing or chimney repair (re-point, re-lead a junction) | £250 – £600 |
| Larger leak or valley repair (failed valley, wider covering) | £400 – £1,200 |
| Internal plaster & decoration making-good | Separate (see below) |
Prices are a guide only and vary with access, roof type and what the inspection finds. We give a free, fixed written quote before any work starts, with no call-out charge, so you always know the exact figure up front.
What decides where you land in the range
Two homes with the same leak can get different quotes, and it is not a con, it comes down to three real factors.
- Access and height. A single-storey extension leak reachable from a ladder is quick. A leak high on a three-storey terrace, or one that needs scaffolding or a tower to reach safely, costs more because of the setup, not the repair itself. Access is often the biggest single swing in a quote.
- The cause of the leak. Swapping a slipped tile is fast and cheap. Re-leading a chimney flashing, rebuilding a valley or lifting and re-bedding a section of covering takes more time, more material and more skill.
- How long it has been left. A leak caught in the first week is usually just the roof repair. A leak left for months can mean wet, rotten timber that needs replacing before the covering goes back, which adds cost.
The internal repair is a separate cost
This trips people up. Fixing the roof stops the water, but it does not repair the ceiling the water already damaged. The internal making-good is a second job, and depending on the damage it can involve drying out the area over several days, cutting out and replacing soaked plasterboard, stain-block priming and repainting, and replacing saturated loft insulation. A small stain that only needs drying and repainting is minor. A section of ceiling that has come down is more involved. We will always tell you plainly which of these you are looking at so there are no surprises.
Is it worth fixing straight away?
Almost always, yes. The maths is simple. A leak trace and minor repair sits at the bottom of the table above. Leave the same leak through a wet winter and you are potentially adding rotten timber, ruined insulation, a collapsed section of ceiling and mould treatment on top. The repair does not get cheaper by waiting, it gets more expensive, and the disruption grows with it. For a fuller breakdown of what roofing work costs across the board, see our roofing costs page.
When you should reach out to Alliance Roofing & Building
If you’re seeing water on your ceiling after rain, you don’t need a sales pitch, you need clarity.
If you want, Alliance Roofing & Building can:
- Find the real entry point, not just the stain
- Explain what’s going on in plain English
- Fix the roof issue properly, so it doesn’t keep coming back
We cover homes right across Buckinghamshire and the wider South East, usually with a same-day inspection.
At the bottom of this page there’s a contact form. Send over:
- a quick description of when it happens
- photos of the ceiling stain
- any photos you can safely take from outside
We’ll tell you what’s most likely, what’s urgent, and what the next step is.